Rooting the Eight Sleep Pod 3
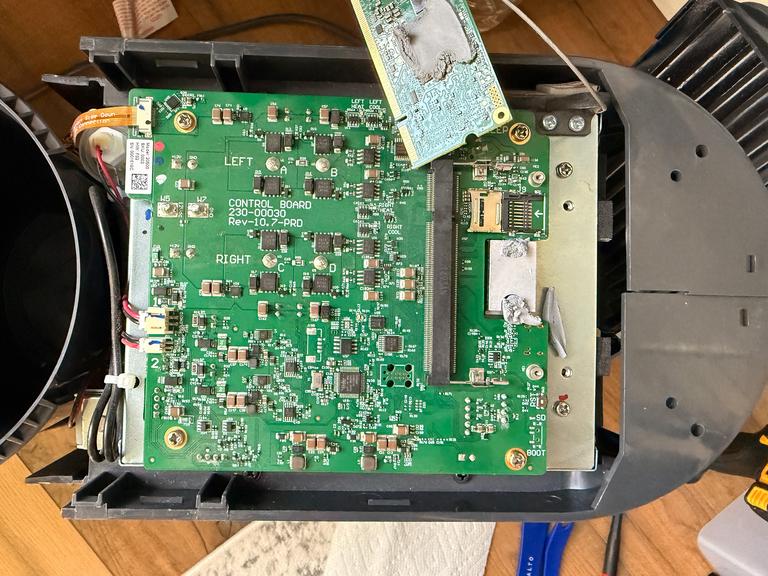
I’ve been meaning to root my Eight Sleep Pod 3 since the large AWS outage in late 2025.1 During the incident, myself and all other Eight Sleep users were unable to control a simple machine sitting at their bedside due to problems on servers thousands of miles away. That outage is part of what pushed me to write about ownership last year.
My main source of information for this project were the free-sleep open-source app and Bo Lopker’s ZeroSleep article. The free-sleep app is compatible with a wide variety of Pod versions, so if I ever buy a newer Pod, I can root that one too.
To get root on my Pod I had to patch the firmware archive stored on the SD card, which the Pod uses to configure itself after a factory reset. If you hold the smaller button on the back while plugging in the power, the Pod starts up from the card instead of its internal storage. A script on the card then:
- unpacks
/opt/images/Yocto/rootfs.tar.gzonto the internal storage (eMMC) with GNUtar - switches the Pod back to starting from internal storage and reboots
So whatever is in that archive becomes the Pod’s system. By adding a SSH key, giving rewt passwordless sudo, and blocking updates from Eight Sleep’s servers, you can get persistent root.
The free-sleep installation guide and Bo Lopker’s article both have great instructions for how to get physical access to the SD card, which sits under the daughter board. I went slowly and carefully and still broke several plastic clips, though you can’t tell once it’s back together. Once you have the SD card, follow the steps below. Be aware that they are tailored for macOS. Unfortunately, macOS can’t read ext4 natively. I used debugfs from e2fsprogs, which reads and writes ext4 directly without mounting anything.
1. Install the tools
brew install e2fsprogs gnu-tar
export PATH="$(brew --prefix e2fsprogs)/sbin:$PATH"
Homebrew doesn’t add e2fsprogs to your PATH by default, so you need the export. Commands run with sudo use the full path instead, because sudo resets PATH. You only need gtar to check the archive the way the Pod will read it.
2. Find the SD card
diskutil list # look for a ~16 GB card with three "Linux" partitions, e.g. /dev/disk4
If macOS says “The disk you inserted was not readable”, click Ignore. The Initialize option leads to reformatting the card. Then give yourself read access to the card. These permissions reset when the card is ejected:
sudo chmod o+r /dev/rdiskN /dev/diskNs? /dev/rdiskNs?
3. Back up the SD card
dd if=/dev/rdiskN of=sdcard-full.img bs=4m
shasum -a 256 /dev/rdiskN sdcard-full.img # the two checksums must match
4. Copy the firmware off
dumpe2fs -h /dev/rdiskNs1 | grep -E 'volume name|state'    # expect "A" and "clean"
debugfs -R "dump /opt/images/Yocto/rootfs.tar.gz rootfs.tar.gz" /dev/rdiskNs1
5. Create an SSH key for the Pod
ssh-keygen -t ed25519 -N "" -C "eight-pod" -f ~/.ssh/eight-pod
6. Prepare the three changes
mkdir -p stage
tar -xzf rootfs.tar.gz -C stage ./etc/ssh/authorized_keys # extract only this one file
cat ~/.ssh/eight-pod.pub >> stage/etc/ssh/authorized_keys

mkdir -p stage/etc/sudoers.d stage/etc/systemd/system
printf 'rewt ALL=(ALL) NOPASSWD: ALL\n' > stage/etc/sudoers.d/001_rewt
chmod 644 stage/etc/ssh/authorized_keys stage/etc/sudoers.d/001_rewt
visudo -c -f stage/etc/sudoers.d/001_rewt # expect "parsed OK"

for u in swupdate.service swupdate.socket swupdate-progress.service defibrillator.service; do
  ln -s /dev/null stage/etc/systemd/system/$u # same effect as "systemctl mask"
done
7. Append the changes to the firmware archive
gunzip -c rootfs.tar.gz > rootfs.tar
(cd stage && COPYFILE_DISABLE=1 tar --no-xattrs --uid 0 --gid 0 --numeric-owner -rf ../rootfs.tar \
  ./etc/ssh/authorized_keys \
  ./etc/sudoers.d/001_rewt \
  ./etc/systemd/system/swupdate.service \
  ./etc/systemd/system/swupdate.socket \
  ./etc/systemd/system/swupdate-progress.service \
  ./etc/systemd/system/defibrillator.service)
gzip -c rootfs.tar > rootfs-patched.tar.gz
When an archive contains the same path twice, GNU tar keeps the later copy, so the appended files replace the originals when the Pod unpacks it. Appending also leaves every other file’s ownership exactly as it was.
8. Check the patched archive
tar -tvzf rootfs-patched.tar.gz | tail -6     # all six entries owned by "0 0"
gtar --warning=no-timestamp -tvf rootfs-patched.tar.gz > /dev/null && echo "GNU tar OK"
GNU tar prints one harmless warning, Ignoring unknown extended header keyword 'LIBARCHIVE.creationtime', and still exits successfully.
9. Write the patched firmware to the card
printf 'cd /opt/images/Yocto\nrm rootfs.tar.gz\nwrite rootfs-patched.tar.gz rootfs.tar.gz\nsif rootfs.tar.gz uid 0\nsif rootfs.tar.gz gid 0\n' \
  | sudo "$(brew --prefix e2fsprogs)/sbin/debugfs" -w -f - /dev/diskNs1 && sync
10. Check the write and eject
debugfs -R "dump /opt/images/Yocto/rootfs.tar.gz check.tar.gz" /dev/rdiskNs1
shasum -a 256 check.tar.gz rootfs-patched.tar.gz    # must match
e2fsck -fn /dev/rdiskNs1                             # must be clean
diskutil eject diskN
11. Factory-reset the Pod
Put the SD card back into the control board and reinstall the daughter board. Then, while holding the smaller button on the back of the Pod, plug in the power cord to force the Pod to factory reset. Once it starts flashing green, let go of the reset button. A few minutes later the Pod will be ready for setup in the Eight Sleep iOS app. You only need the app to give the Pod your Wi-Fi details.
12. Log in and get root
ssh -i ~/.ssh/eight-pod -p 8822 rewt@POD_IP
imx8mm-var-dart-eight:~$ sudo -i
root@imx8mm-var-dart-eight:~#
13. Install free-sleep
Follow free-sleep’s INSTALLATION.md:
- Run free-sleep’s step 11, the two
systemctlcommands. “Already masked” and “does not exist” messages are expected. - Skip free-sleep’s step 12, since Wi-Fi is already set up through the app.
- Run free-sleep’s step 13, the installer.
- Open
http://POD_IP:3000.
Loading the free-sleep web page for the first time was exhilarating after spending hours fiddling with everything. The wide variety of capabilities is impressive and perfectly suitable for my needs. The best thing of all is the responsiveness of the app when controlling the Pod. When the temperature is adjusted you can hear the Pod pumps engage in under a second. Every command stays on my network and it would still work if my home’s internet went down.
Rooting hardware in your home carries real risk, and if something goes wrong, you’re on your own. I’d still take that over a bed tethered to a company’s cloud.
Sopan Deb, “AWS Cloud-Computing Outage Left Smart Bed Customers without Sleep,” New York Times, October 24, 2025, https://www.nytimes.com/2025/10/24/business/amazon-aws-outage-eight-sleep-mattress.html. ↩︎
⁂